Showing posts with label bloggger gadgets. Show all posts

Thursday, April 18, 2013

How To Add Floating Facebook Like Box In Blogger?


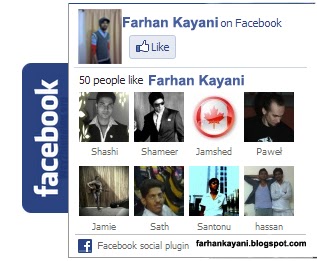
Today I share the widget of blogger.Here is Floating Fb Like box.This widget is best for web/blogbecause social media is most important to promote your blog.customize this widget e.g You Can Chang it's Position.This widget Make your blog more Beautiful.Maybe you Like this post.If you want to adding this widget in blogger.please follow these steps.See pic Example of  Floatindfacebook like box.


How to Add Floating Facebook Like box to blog?
Follow steps and add this widget. 
  • Go to Blogger > Layout > Add a Gadget > Select HTML/JavaScript Gadget
  • Add an HTML/JavaScript Widget and paste below codes in Gadget box.

<script type="text/javascript">
//<!--
$(document).ready(function() {$(".w2bslikebox").hover(function() {$(this).stop().animate({right: "0"}, "medium");}, function() {$(this).stop().animate({right: "-250"}, "medium");}, 500);});
//-->
</script>
<style type="text/css">
.w2bslikebox{background: url("https://blogger.googleusercontent.com/img/b/R29vZ2xl/AVvXsEjAdFCsTtnV8Q8TFitnnEX7VtgpbwIZnUqMr0LRzIXbT6Zy22xhHRTNRBuhoXGt8O-qt0NpqrAEzSgc1EOcxgOo9OpKVVf9rOSK3Hat4wQ6TthdDTPUqvF8mKkVCId5RDXe3ERShU6Xb7HO/s150/w2b_facebookbadge.pn") no-repeat scroll left center transparent !important;display: block;float: right;height: 270px;padding: 0 5px 0 46px;width: 245px;z-index: 99999;position:fixed;right:-250px;top:20%;}
.w2bslikebox div{border:none;position:relative;display:block;}
.w2bslikebox span{bottom: 12px;font: 8px "lucida grande",tahoma,verdana,arial,sans-serif;position: absolute;right: 6px;text-align: right;z-index: 99999;}
.w2bslikebox span a{color: #808080;text-decoration:none;}
.w2bslikebox span a:hover{text-decoration:underline;}
</style><div class="w2bslikebox" style=""><div>
<iframe src="http://www.facebook.com/plugins/likebox.php?href=http%3A%2F%2Ffacebook.com%2FMr.FarhanKayani&amp;width=245&amp;colorscheme=light&amp;show_faces=true&amp; connections=9&amp;stream=false&amp;header=false&amp;height=270" scrolling="no" frameborder="0" scrolling="no" style="border: medium none; overflow: hidden; height: 270px; width: 245px;background:#fff;"></iframe></div></div>

Save the widget.

After adding above code now find this tag </head> (use:Ctrl =f)  in your Template >> HTML >> Proceed and Paste the below codes just  above/before the </head> tag.
<script src='https://ajax.googleapis.com/ajax/libs/jquery/1.6.1/jquery.min.js' type='text/javascript'/>


 Changing Mr.FarhanKayani with your Facebook's page user name and  float:right, if you want this Fb like box   appear at left side then change the property right to left in e.g float:left


Sunday, February 3, 2013

Nice jQuery Tab Menu for your blog


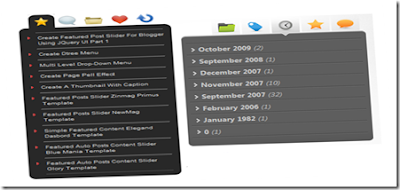
Hi guys, I have brought you a killer gadget for your blog. Add this gadget and make your blog more interesting. Lets start.

First go to Layout >> Edit HTML. Remember to tick on Expand Widget Templates. Now press CTRL+F. Then you can see a search bar. Type </head>   on the search bar. You can see in the HTML box the code </head> is highlighted. Now paste this code below the </head> code.


<script src='http://ajax.googleapis.com/ajax/libs/jquery/1.3.1/jquery.min.js' type='text/javascript'/>
<script type='text/javascript'>$(document).ready(function() { //Get all the LI from the #tabMenu UL$(&#39;#tabMenu &gt; li&#39;).click(function(){//perform the actions when it&#39;s not selectedif (!$(this).hasClass(&#39;selected&#39;)) { //remove the selected class from all LI $(&#39;#tabMenu &gt; li&#39;).removeClass(&#39;selected&#39;);//Reassign the LI$(this).addClass(&#39;selected&#39;);//Hide all the DIV in .boxBody$(&#39;.boxBody div&#39;).slideUp(&#39;1500&#39;);//Look for the right DIV in boxBody according to the Navigation UL index, therefore, the arrangement is very important.$(&#39;.boxBody div:eq(&#39; + $(&#39;#tabMenu &gt; li&#39;).index(this) + &#39;)&#39;).slideDown(&#39;1500&#39;);}}).mouseover(function() {//Add and remove class, Personally I dont think this is the right way to do it, anyone please suggest $(this).addClass(&#39;mouseover&#39;);$(this).removeClass(&#39;mouseout&#39;);}).mouseout(function() {//Add and remove class$(this).addClass(&#39;mouseout&#39;);$(this).removeClass(&#39;mouseover&#39;); });//Mouseover with animate Effect for Category menu list$(&#39;.boxBody #category li&#39;).click(function(){//Get the Anchor tag href under the LIwindow.location = $(this).children().attr(&#39;href&#39;);}).mouseover(function() {//Change background color and animate the padding$(this).css(&#39;backgroundColor&#39;,&#39;#888&#39;);$(this).children().animate({paddingLeft:&quot;20px&quot;}, {queue:false, duration:300});}).mouseout(function() {//Change background color and animate the padding$(this).css(&#39;backgroundColor&#39;,&#39;&#39;);$(this).children().animate({paddingLeft:&quot;0&quot;}, {queue:false, duration:300});});//Mouseover effect for Posts, Comments, Famous Posts and Random Posts menu list.$(&#39;#.boxBody li&#39;).click(function(){window.location = $(this).children().attr(&#39;href&#39;);}).mouseover(function() {$(this).css(&#39;backgroundColor&#39;,&#39;#888&#39;);}).mouseout(function() {$(this).css(&#39;backgroundColor&#39;,&#39;&#39;);}); });</script>
Now find the code ]]></b:skin> by pressing CTRL+F. Now paste this code before the code ]]></b:skin>.


#tabMenu {margin:0; padding:0 0 0 15px;list-style:none;}#tabMenu li {float:left;height:32px;width:39px;cursor:pointer;cursor:hand}/* this is the button images http://amatullah83.blogspot.com*/li.comments {background:url(http://sites.google.com/site/amatullah83/bg/tabComment.png) no-repeat 0 -32px;}li.posts {background:url(http://sites.google.com/site/amatullah83/bg/tabstar.png) no-repeat 0 -32px;}li.category {background:url(http://sites.google.com/site/amatullah83/bg/tabFolder.png) no-repeat 0 -32px;}li.famous {background:url(http://sites.google.com/site/amatullah83/bg/tabHeart.png) no-repeat 0 -32px;}li.random {background:url(http://sites.google.com/site/amatullah83/bg/tabRandom.png) no-repeat 0 -32px;}li.mouseover {background-position:0 0;}li.mouseout {background-position:0 -32px;}li.selected {background-position:0 0;}.box {width:227px}.boxTop {background:url(http://sites.google.com/site/amatullah83/bg/boxTop.png)no-repeat;height:11px;clear:both}.boxBody {background-color:#282828;}.boxBottom {background:url(http://sites.google.com/site/amatullah83/bg/boxBottom.png) no-repeat;height:11px;}.boxBody div {display:none;}.boxBody div.show {display:block;}.boxBody #category a {display:block}/* styling for the content*/.boxBody div ul { margin:0 10px 0 25px;padding:0;width:190px;list-style-image:url(http://sites.google.com/site/amatullah83/bg/arrow.gif)}.boxBody div li {border-bottom:1px dotted #8e8e8e; padding:4px 0;cursor:hand;cursor:pointer;font-size:10px; color:#DDDDDD;text-decoration: none;}.boxBody div ul li.last {border-bottom:none}.boxBody div li a{font-size:10px; color:#DDDDDD;text-decoration: none;}.boxBody div li span { font-size:8px;color:#9F9F9F;}/* IE Hacks */*html .boxTop {margin-bottom:-2px;}*html .boxBody div ul {margin-left:10px;padding-left:15px;}
Now save the template.

Then go to Layout >> Page Element >> Add a gadget >> "Html/java script" and paste this code on the java script.


<div class="box">
<ul id="tabMenu"><li class="posts selected"></li> <!-- default button--><li class="comments"></li><li class="category"></li><li class="famous"></li><li class="random"></li></ul>
<div class="boxTop"></div>
<div class="boxBody"><!-- default page--><div id="posts" class="show"><ul><li>Post 1</li><li>Post 2</li><li class="last">Post 3</li></ul></div><div id="comments"><ul><li>Comment 1</li><li>Comment 2</li><li class="last">Comment 3</li></ul></div><div id="category"><ul><li>Category 1</li><li>Category 2</li><li class="last">Category 3</li></ul></div><div id="famous"><ul><li>Famous post 1</li><li>Famous post 2</li><li class="last">Famous post 3</li></ul></div><div id="random"><ul><li>Random post 1</li><li>Random post 2</li><li class="last">Random post 3</li></ul> </div> 
</div>
<div class="boxBottom"></div>
</div>
Now save the java script. Its over. Enjoy.

Thursday, January 31, 2013

Add a beautiful Image slide show gadget to your blog


Hi guys, I have brought a nice gadget for you. You can add your favourite posts. This will make your blog more attractive. If you like this gadget, I can help you to add this to your blog. Lets start.

First go to Layout >> Edit HTML. Remember to Tick on Expand widget templates. Then press Ctrl+F. Then you will see a search bar.

Type </head> on the search box. Then you can see this code will be highlighted on your html box. Now paste this above the </head> code.

<!--SLIDE-SHOW-STARTS--><br /> <!-- JavaScripts--><br /> <script type="text/javascript" src="http://sites.google.com/site/saamgeadaviya/www.saamgeadaviya.blogspot.com-jquery.js"></script><br /> <script type="text/javascript" src="http://sites.google.com/site/saamgeadaviya/www.saamgeadaviya.blogspot.com-s3Slider.js"></script><br /> <script type="text/javascript"><br /> $(document).ready(function() {<br /> $('#slider').s3Slider({<br /> timeOut: 3000<br /> });<br /> });<br /> </script><br /> <!-- CSS --><br /> <style type="text/css" media="screen"><br /> #slider {<br /> width: 410px; /* important to be same as image width */<br /> height: 300px; /* important to be same as image height */<br /> position: relative; /* important */<br /> overflow: hidden; /* important */<br /> }<br /> #sliderContent {<br /> width: 410px; /* important to be same as image width or wider */<br /> position: absolute;<br /> top: 0;<br /> margin-left: 0;<br /> }<br /> .sliderImage {<br /> float: left;<br /> position: relative;<br /> display: none;<br /> }<br /> .sliderImage span {<br /> position: absolute;<br /> font: 10px/15px Arial, Helvetica, sans-serif;<br /> padding: 10px 13px;<br /> width: 384px;<br /> background-color: #000;<br /> filter: alpha(opacity=70);<br /> -moz-opacity: 0.7;<br /> -khtml-opacity: 0.7;<br /> opacity: 0.7;<br /> color: #fff;<br /> display: none;<br /> }<br /> .clear {<br /> clear: both;<br /> }<br /> .sliderImage span strong {<br /> font-size: 14px;<br /> }<br /> .top {<br /> top: 0;<br /> left: 0;<br /> }<br /> .bottom {<br /> bottom: 0;<br /> left: 0;<br /> }<br /> ul { list-style-type: none;}<br /> </style><br /> <!--SLIDE-SHOW-STOPS-4-HELP-http://saamgeadaviya.blogspot.com-->

Now save the template. Now go to  Layout >> Page Element >> Add a gadget >> "Html/java script"
and get a new java script. Copy and paste the code shown below to that java script.

<div id="slider"><ul id="sliderContent"><li class="sliderImage"><a href=""><img src="images/410/1.jpg" alt="1" /></a><span class="top"><strong>Title text 1</strong><br />Content text...</span></li><li class="sliderImage"><a href=""><img src="images/410/2.jpg" alt="2" /></a><span class="top"><strong>Title text 2</strong><br />Content text...Content text...Content text...Content text...Content text...Content text...Content text...Content text...Content text...Content text...Content text...</span></li><li class="sliderImage"><img src="images/410/3.jpg" alt="3" /><span class="bottom"><strong>Title text 3</strong><br />Content text...</span></li><li class="sliderImage"><img src="images/410/4.jpg" alt="4" /><span class="bottom"><strong>Title text 4</strong><br />Content text...</span></li><li class="sliderImage"><img src="images/410/5.jpg" alt="5" /><span class="top"><strong>Title text 5</strong><br />Content text...</span></li><div class="clear sliderImage"></div></ul></div>

Now save the template. Then its finished.

IMPORTANT 


In the code add the link of the photo that you want to upload on the places Written with red.
Add the name of the post to the places written in green.
Add a little description to the place written in blue.

Twitter Delicious Facebook Digg Stumbleupon Favorites More

 
Design by Free WordPress Themes | Bloggerized by Lasantha - Premium Blogger Themes | Powerade Coupons