


 5:58 PM
 Unknown

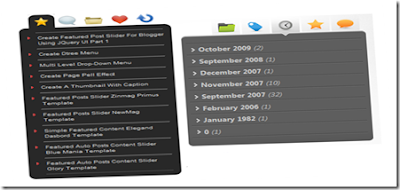
Hi guys, I have brought you a killer gadget for your blog. Add this gadget and make your blog more interesting. Lets start.
First go to Layout >> Edit HTML. Remember to tick on Expand Widget Templates. Now press CTRL+F. Then you can see a search bar. Type </head> on the search bar. You can see in the HTML box the code </head> is highlighted. Now paste this code below the </head> code.
Then go to Layout >> Page Element >> Add a gadget >> "Html/java script" and paste this code on the java script.
<script src='http://ajax.googleapis.com/ajax/libs/jquery/1.3.1/jquery.min.js' type='text/javascript'/>Now find the code ]]></b:skin> by pressing CTRL+F. Now paste this code before the code ]]></b:skin>.
<script type='text/javascript'>$(document).ready(function() { //Get all the LI from the #tabMenu UL$('#tabMenu > li').click(function(){//perform the actions when it's not selectedif (!$(this).hasClass('selected')) { //remove the selected class from all LI $('#tabMenu > li').removeClass('selected');//Reassign the LI$(this).addClass('selected');//Hide all the DIV in .boxBody$('.boxBody div').slideUp('1500');//Look for the right DIV in boxBody according to the Navigation UL index, therefore, the arrangement is very important.$('.boxBody div:eq(' + $('#tabMenu > li').index(this) + ')').slideDown('1500');}}).mouseover(function() {//Add and remove class, Personally I dont think this is the right way to do it, anyone please suggest $(this).addClass('mouseover');$(this).removeClass('mouseout');}).mouseout(function() {//Add and remove class$(this).addClass('mouseout');$(this).removeClass('mouseover'); });//Mouseover with animate Effect for Category menu list$('.boxBody #category li').click(function(){//Get the Anchor tag href under the LIwindow.location = $(this).children().attr('href');}).mouseover(function() {//Change background color and animate the padding$(this).css('backgroundColor','#888');$(this).children().animate({paddingLeft:"20px"}, {queue:false, duration:300});}).mouseout(function() {//Change background color and animate the padding$(this).css('backgroundColor','');$(this).children().animate({paddingLeft:"0"}, {queue:false, duration:300});});//Mouseover effect for Posts, Comments, Famous Posts and Random Posts menu list.$('#.boxBody li').click(function(){window.location = $(this).children().attr('href');}).mouseover(function() {$(this).css('backgroundColor','#888');}).mouseout(function() {$(this).css('backgroundColor','');}); });</script>
#tabMenu {margin:0; padding:0 0 0 15px;list-style:none;}#tabMenu li {float:left;height:32px;width:39px;cursor:pointer;cursor:hand}/* this is the button images http://amatullah83.blogspot.com*/li.comments {background:url(http://sites.google.com/site/amatullah83/bg/tabComment.png) no-repeat 0 -32px;}li.posts {background:url(http://sites.google.com/site/amatullah83/bg/tabstar.png) no-repeat 0 -32px;}li.category {background:url(http://sites.google.com/site/amatullah83/bg/tabFolder.png) no-repeat 0 -32px;}li.famous {background:url(http://sites.google.com/site/amatullah83/bg/tabHeart.png) no-repeat 0 -32px;}li.random {background:url(http://sites.google.com/site/amatullah83/bg/tabRandom.png) no-repeat 0 -32px;}li.mouseover {background-position:0 0;}li.mouseout {background-position:0 -32px;}li.selected {background-position:0 0;}.box {width:227px}.boxTop {background:url(http://sites.google.com/site/amatullah83/bg/boxTop.png)no-repeat;height:11px;clear:both}.boxBody {background-color:#282828;}.boxBottom {background:url(http://sites.google.com/site/amatullah83/bg/boxBottom.png) no-repeat;height:11px;}.boxBody div {display:none;}.boxBody div.show {display:block;}.boxBody #category a {display:block}/* styling for the content*/.boxBody div ul { margin:0 10px 0 25px;padding:0;width:190px;list-style-image:url(http://sites.google.com/site/amatullah83/bg/arrow.gif)}.boxBody div li {border-bottom:1px dotted #8e8e8e; padding:4px 0;cursor:hand;cursor:pointer;font-size:10px; color:#DDDDDD;text-decoration: none;}.boxBody div ul li.last {border-bottom:none}.boxBody div li a{font-size:10px; color:#DDDDDD;text-decoration: none;}.boxBody div li span { font-size:8px;color:#9F9F9F;}/* IE Hacks */*html .boxTop {margin-bottom:-2px;}*html .boxBody div ul {margin-left:10px;padding-left:15px;}Now save the template.
Then go to Layout >> Page Element >> Add a gadget >> "Html/java script" and paste this code on the java script.
<div class="box">Now save the java script. Its over. Enjoy.
<ul id="tabMenu"><li class="posts selected"></li> <!-- default button--><li class="comments"></li><li class="category"></li><li class="famous"></li><li class="random"></li></ul>
<div class="boxTop"></div>
<div class="boxBody"><!-- default page--><div id="posts" class="show"><ul><li>Post 1</li><li>Post 2</li><li class="last">Post 3</li></ul></div><div id="comments"><ul><li>Comment 1</li><li>Comment 2</li><li class="last">Comment 3</li></ul></div><div id="category"><ul><li>Category 1</li><li>Category 2</li><li class="last">Category 3</li></ul></div><div id="famous"><ul><li>Famous post 1</li><li>Famous post 2</li><li class="last">Famous post 3</li></ul></div><div id="random"><ul><li>Random post 1</li><li>Random post 2</li><li class="last">Random post 3</li></ul> </div>
</div>
<div class="boxBottom"></div>
</div>


